How do I upgrade my Cloud server?
Note: At the moment it is not possible to upgrade your Cloud server yourself. Since September 2022, we have said goodbye to Cloud servers on the old Totaalcloud platform (OnApp). We migrated everything to our renewed CloudStack platform during 2022, which is more future-proof and faster. Our knowledge base will receive new articles for this as soon as the interface of the new platform has been broadly developed, it is currently still subject to changes. The article below is therefore no longer applicable for upgrades to Cloud servers. Therefore, please contact our support for the technical implementation of the upgrade.
If you have a cloud hosting server with Neostrada you have the option to expand it with more CPU, RAM and storage (your disk volume). In this article we explain how you can request an upgrade and how you can apply it to your server. A downgrade can be applied in the same way.
Important
Your volume of storage, CPU and RAM can only be increased, not decreased. This is due to technical limitations, once expanded the server cannot be downgraded. You can find the different levels of Cloud servers on our cloud page: www.neostrada.com/cloud-servers-vps-hosting.html
Request an upgrade steps
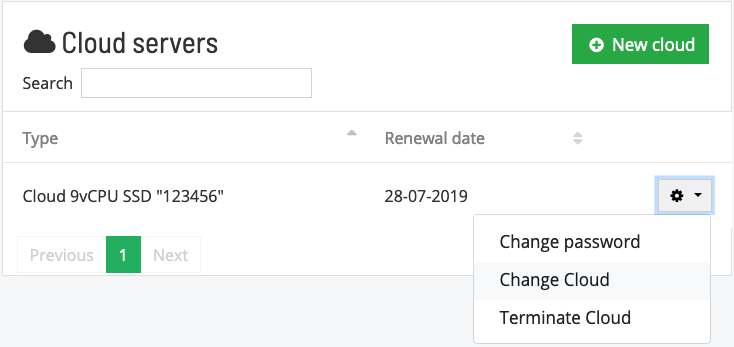
Step 1. Log in to your customer account and go to My Account.
Step 2. Navigate to Cloud servers via the menu on the left.
Step 3. On this page you can see the cloud servers that have been purchased, click on the menu (gear) to the right of the server and click on Change cloud.
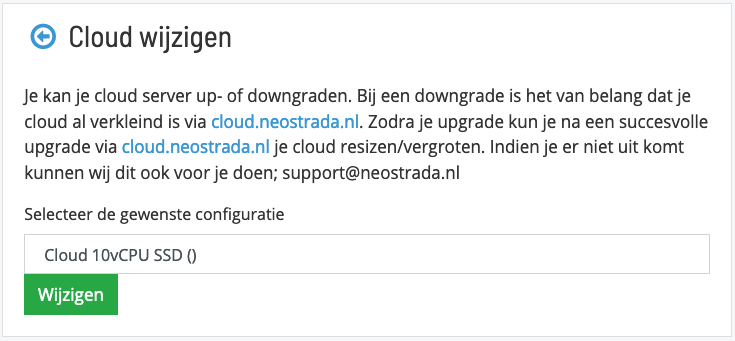
Step 4. Select the type of Cloud you want to upgrade to and click on Change.
Step 5. Your cloud upgrade has now been requested, you can now follow the steps below to add the new system resources to your Cloud.
CPU and RAM upgrade steps
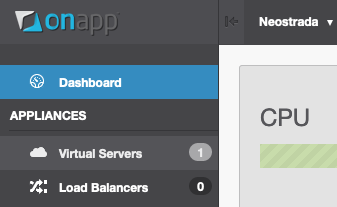
Step 1. Log in to TotaalCloud.
Step 2. Go to Virtual Servers via the menu on the left.
Step 3. You will now see an overview of servers, click on the name of the server (under Label) to which you will apply the upgrade.
Step 4. Click on the green Tools button at the top right of the screen and go to Edit Virtual Server.
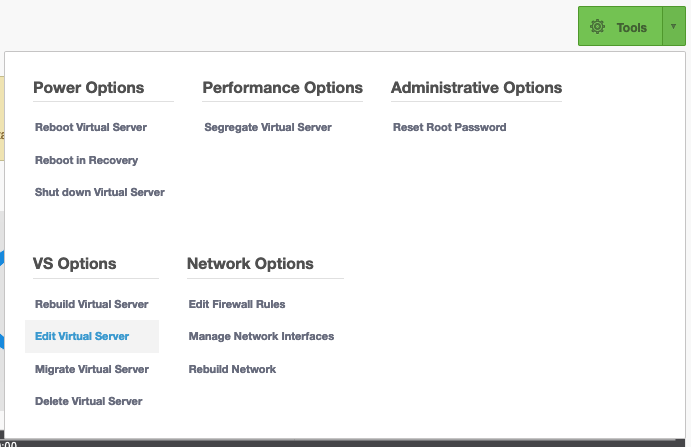
Step 5. Move the sliders for RAM and CPU Cores to the desired level, if you want to apply the entire upgrade move them all the way to the right. CPU Priority should stay on 10%.
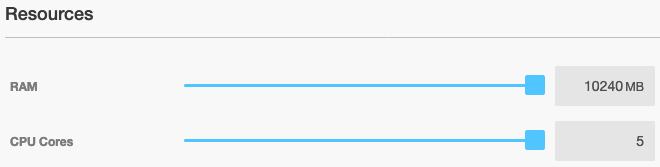
Step 6. Click Save. The server will now be restarted to apply the upgrade. This takes around 5 to 10 minutes.
Storage upgrade Steps
Step 1. Log in to TotaalCloud.
Step 2. Go to Virtual Servers via the menu on the left.
Step 3. You will now see an overview of servers, click on the name of the server (under Label) to which you will apply the upgrade.
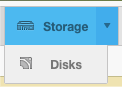
Step 4. Click under Storage on Disks to go to the overview of disks.
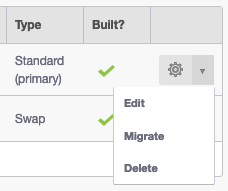
Step 5. In the overview you will find the Standard (Primary) disk, right-click on the menu (gear) and click on Edit.
Step 6. Move the slider for Size to the desired volume size for this disk. Keep in mind that once applied, the size of the disk can no longer be reduced.
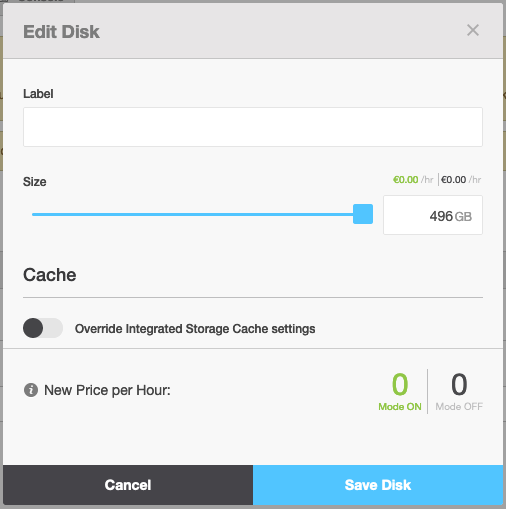
Step 7. Click Save to apply the disk volume upgrade. The server will restart to apply the upgrade, this can take about 5 to 10 minutes.


